| Panoramic video technology — perhaps the first new form
of photography to be invented in this century — puts you in
the middle of a wraparound, photo-quality, virtual-reality
world with no need for helmets, goggles, or gloves.
Apple's QuickTime VR, unveiled in June 1994, gained
national attention when NBC News adapted it to create
panoramas of crime scenes during the murder trial of O. J.
Simpson. Simon & Schuster's CD-ROM, titled Star Trek:
The Next Generation Interactive Technical Manual, was the
first retail product to use QuickTime VR. Released in
November, the Star Trek CD-ROM (see "Books and CD-ROMs:
Star Trek Meets QuickTime VR," March BYTE) quickly sold
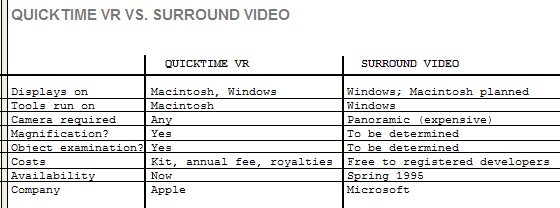
more than 200,000 copies. Developers of game and educational software love this technology because it enables them to photograph scenes that aren't practical to render artificially. WNET, a PBS station in New York, is using QuickTime VR to create a panoramic tour of the Serengeti Plain in Africa. Sumeria, a multimedia developer in San Francisco, is working on QuickTime VR tours of Mayan ruins in Central America. Businesses can use panoramic videos to familiarize employees with the layouts of mazelike factories or offices. Law-enforcement agencies can use panoramas to train SWAT teams. And ultimately, it's possible that panoramas photographed with tiny fiber-optic lenses could open interior spaces, such as the human body, to interactive exploration. Although QuickTime VR panoramas can be displayed on Windows PCs as well as on Macintoshes (the Star Trek CD-ROM is available for both platforms), the special authoring tools run only on a Mac. That limitation prompted Microsoft to embark on a crash program last October to make its own version of QuickTime VR. The result, Surround Video, is scheduled for release as an SDK (Software Development Kit) this spring. In some respects, Surround Video is not as advanced as QuickTime VR (see the table "QuickTime VR vs. Surround Video"). To users, however, it appears very similar to QuickTime VR on the screen, and it will almost certainly attract developers. Four characteristics, listed below, set panoramic video apart from previous technologies. — Unlike other forms of virtual reality, these panoramas are not limited to computer-generated images. QuickTime VR and Surround Video use digitized photos of real-world scenes (although they can also use rendered images or combine elements of both). — Despite their misleading names, QuickTime VR and Surround Video do not require motion-video footage. (But conventional video and animation can be used as layers on the backgrounds.) Since the panoramas are derived from still photos, they don't restrict you to viewing a scene in any predetermined linear sequence. Navigation is completely interactive. — Panoramic video is the only way to map 360-degree panoramas onto a flat surface (in this case, a video screen) without distortion. Photographers have been shooting panoramas since the nineteenth century, but true 360-degree photos suffer from optical distortion unless you bend them into a cylinder and view the panorama from inside. QuickTime VR and Surround Video automatically correct that distortion through software. — Panoramic videos are interactive in ways that are impossible without a computer. For instance, developers can link panoramas together so users can change viewpoints by clicking on predefined hot spots. Also, QuickTime VR lets you zoom a panorama to higher magnifications and view objects from any angle. (Early versions of Surround Video lack these capabilities, but Microsoft says it will add them soon.) Inside a Panorama Imagine a virtual environment in which you can view any portion of a 360-degree panorama — a wraparound photographic image of a real-world scene. You can pan the image left or right in a complete circle. Now add the ability to zoom in for a closer look at small details. You can examine selected objects in the panorama from any angle and even shift your position to other viewpoints, just as if you were actually there. Now imagine that you can achieve this virtual reality without any special gear except the computer on your desk. Apple's QuickTime VR and Microsoft's Surround Video, two similar versions of the new panoramic video technology, provide all this and more. Navigating through a panoramic video is as easy as pointing and clicking with a mouse. The image on the screen represents a small portion of the entire 360-degree view — usually about 70 degrees, depending on the focal length of the lens used to take the original photos. To move your view of the panorama in any direction, you simply move the mouse cursor toward that edge of the screen. Horizontal panning is infinite in either direction; vertical scrolling is limited to the field of view captured by the camera's lens (more on this later). To examine part of a scene at closer range, you can zoom to higher magnifications. The current state of the technology lets you magnify the image about two to four times. QuickTime VR automatically applies an antialiasing filter to smooth out the jagged lines caused by pixelation at these higher magnifications. Most panoramas contain predefined hot spots that allow you to change viewpoints or examine certain objects in more detail. When you point at a hot spot with the mouse, the cursor changes to indicate what you can do. For example, if the developer linked multiple panoramas together, you could jump from one view to another simply by clicking the mouse on the appropriate spot. Another type of hot spot lets you "pick up" and examine certain objects from any angle. To enable this effect, the developer must photograph these objects separately and link them to the general panorama. When you click on one of these objects, a special window opens on the screen, the object enlarges to fill the window, and you can rotate the image 360 degrees horizontally — and nearly as much vertically. This feature suggests all kinds of possibilities. For instance, a panoramic tour of a museum could allow you to pick up and examine artifacts that normally would be off-limits to visitors. Apple and Microsoft are currently adding even more capabilities. Developers will soon be able to combine video footage with interactive environments by overlaying QuickTime or AVI (Audio Video Interleave) movies on panoramic backgrounds. Apple is perfecting an enhancement, called localized sound, that links prerecorded audio to your real-time video navigation. In one of Apple's demonstrations, you can scroll around a panorama of a beach scene. When a beach cottage comes into view, you can hear the faint sounds of voices. If you zoom in for a closer look, the voices become more distinct and combine with the sounds of a party. When you zoom back out, the sounds get softer again. For Experts Only Although viewing and navigating through a panorama are easy, creating one is a different matter. For now, the authoring tools and photographic skills required for this task are beyond the capabilities of most users. Someday these tools may become as easy to use as morphing programs, but until then, only the most advanced users and professional developers will be able to create panoramas. The first step in the process is to shoot the pictures. This is where Surround Video differs significantly from QuickTime VR. Surround Video requires a special panoramic camera that rotates in a circle while continuously exposing a strip of film that moves in the opposite direction. In other words, instead of snapping a normal picture, the camera optically scans the image onto the film to make a strip that's about 7 inches long. (See the figure "How a Panoramic Camera Works".) QuickTime VR also lets you use a panoramic camera, but doesn't require it. Instead, Apple has sophisticated software tools that can assemble a panorama from a series of still photos taken with an ordinary camera. The key to this process is a program called Stitcher, which automatically joins the individual photos together to make a seamless 360-degree view. No matter which kind of camera you use, the result is the same: an image with a very wide aspect ratio that encompasses a 360-degree view of the original scene. Apple does it with software, while Microsoft does it with hardware. Apple's approach offers more flexibility because you can take pictures with almost any camera, lens, or film format. (In fact, Apple has produced panoramas with inexpensive disposable cameras.) But Apple does not recommend using a still-video camera, such as the Canon RC-570, or a low-resolution digital camera, such as the QuickTake 100, or a frame-grabber with videotape. These devices don't deliver enough resolution to withstand magnification. Shooting pictures for a QuickTime VR panorama is a bit tricky. First, the lens has to be of a rectilinear design, which includes most lenses for general photography, except for fish-eye lenses. The curvilinear images produced by fish-eye lenses won't work with the Stitcher program. Rectilinear lenses are designed to keep straight lines straight. (Apple recommends Sigma's 14mm f/3.5 and Nikon's 15mm f/3.5.) To include as much vertical space as possible, you should turn the camera sideways, even though this increases the number of pictures required to cover the 360-degree field. A 15mm lens is wide enough to cover that field in as few as eight frames, but Apple recommends shooting 12 frames of each scene to allow plenty of overlap. When shooting these pictures, you have to rotate the camera around the nodal point (i.e., the optical center) of the lens. Otherwise, each frame will record a slightly different viewpoint, and the panorama will appear to jump when the user pans across the image. This is especially true if the scene includes objects that are close to the camera, because the parallax error between frames will be more obvious. Unfortunately, tripod sockets are usually near the focal plane, not the nodal point. And the nodal point might not coincide with the physical center of the lens. To get around this problem, you need a special tripod head that makes it easier to visually identify the nodal point and adjust the camera's position. Apple is working with a manufacturer to produce one that is specially suited for QuickTime VR. You can skip all this trouble by using a panoramic camera, which automatically rotates around a fixed nodal point. But such cameras have problems of their own. Only the most expensive models have interchangeable lenses, so you're restricted to a single perspective. These lenses are not very wide, so the vertical field of view is limited. And if you aren't careful, you might catch yourself in the picture. To digitize the long filmstrip from a panoramic camera with enough resolution to support high magnifications, you have to use an expensive drum scanner that's big enough to accommodate the strip. Standard film scanners won't work, and flatbed scanners aren't recommended. A Stitch in Time The best way to digitize photos for a QuickTime VR panorama is to scan the film onto a Kodak Photo CD, which yields resolutions as high as 2048 by 3072 pixels at a color depth of 24 bits. That much resolution is overkill, however, and file sizes are large (more than 200 MB) when a dozen or more frames are stitched together. QuickTime VR panoramas typically use the Photo CD base resolution of 768 by 512 pixels at 24 bits. If you stitch together 12 pictures, the resulting strip is a PICT file that's about 768 pixels high by 2496 pixels wide (after redundant information between frames drops out). Apple uses the Cinepak codec in QuickTime to compress this file down to a manageable 520 to 800 KB. (Surround Video panoramas are uncompressed and average about 1.4 MB, because on-the-fly decompression would impair playback performance.) Apple's Stitcher program is mostly automatic, but it does require some intervention by the developer. Among other things, you must tell the program whether the camera was oriented vertically or horizontally and how much overlapping area between frames should be analyzed when the edges are joined together. As long as those areas contain sufficient detail, Stitcher does a good job of matching the seams and eliminating redundant information. For example, if the right edge of one frame and the left edge of the next frame both include the same object — such as a doorknob — Stitcher can figure out that the object should appear only once in the panorama and deletes the overlapping portion. Stitcher also blends exposure differences between frames, so you can shoot the pictures at slightly different settings to maximize highlight and shadow details in different parts of the scene. To align the seams, Stitcher applies cylindrical distortion across the entire image. This might appear counterintuitive — why shoot the pictures with a rectilinear lens if you're going to add distortion later? However, cylindrical distortion is necessary to produce a continuous, seamless image in which details along the frame boundaries match up perfectly (see the figure "How Apple's Stitcher Tool Works"). The result is a very wide image that's virtually identical to the cylindrically distorted filmstrip exposed by a panoramic camera. If you could join the ends of this strip together and stick your head inside the cylinder, you'd see an undistorted 360-degree view — which is exactly what the playback software does when it displays the panorama on the screen. QuickTime VR and Surround Video can work with any digitized images, not just photos. If you'd rather create an artificial world, you can use a rendering program instead of a camera. You can also use an image-editing program to modify the panorama or combine photographic images with rendered graphics. Finishing Touches Once you have a panorama, the next step is to define the hot spots that link it to other panoramas (if any). Apple and Microsoft provide tools for creating these links. Apple's tool is a HyperCard program called Scene Editor. Using a standard paint program, you draw solid colors over areas of the panorama that will be hot. Each color marks a different hot spot, so they can be irregular shapes and noncontiguous. Areas that aren't hot are erased, yielding a white-background mask that Scene Editor links transparently to the panorama. In addition to linking panoramas together, you can use Scene Editor to assign hot spots to objects. (Microsoft says it will add this feature to Surround Video, too.) QuickTime VR can display a magnified view of an object, and the user can rotate the image in any direction. Of course, this assumes the developer has already photographed the object from every angle. This process requires about 500 images of the object. To make it easier to shoot these pictures with the proper alignment, Apple has a so-called bread-box rig that aims a camera along any angle at an object in the center of an imaginary globe. (The rig acquired its name because it accommodates objects as large as a bread box.) The camera can shoot pictures while traversing imaginary latitudinal lines around the object. Each of the approximately 15 lines requires 36 pictures to cover the entire object. Since these close-up images don't require the high resolution of a panorama, they can be taken with a video camera and a frame-grabber — which is faster and more economical than shooting 500 pictures with a 35mm camera. Another QuickTime VR tool, Object Maker, converts these 500 views into a QuickTime movie file that the user can manipulate interactively. The final step of the process is to package the panoramas, hot-spot masks, object views, layered movies, sounds, and other elements into a format that the QuickTime VR or Surround Video playback software can handle. Again, both Apple and Microsoft supply tools for this purpose. QuickTime VR panoramas convert from PICT files to standard QuickTime MOOV files. During compression, the panorama is sliced into vertical strips measuring about 768 pixels high by 104 pixels wide. To reduce memory requirements, only part of the panorama initially loads into RAM. Additional strips load into memory when the user pans horizontally. Surround Video uses a technique that is similar, except without compression. The panoramic file is called a striped DIB (device-independent bit map). It's much like a regular Windows BMP or DIB file, except the image is sliced into vertical strips measuring only 4 pixels wide. When the user pans left or right, the appropriate strips load into memory. Additional elements (e.g., movies and sounds) are stored in another new file type called an asset database, which is similar to a Macintosh resource file. Developer Trade-Offs Apple and Microsoft are taking very different approaches to their distribution of the authoring tools. Apple charges $2000 for the QuickTime VR kit; this does not include the annual fee for becoming a registered developer. QuickTime VR authoring also requires HyperCard and MPW, which Apple includes in the package it sends to developers. Apple also charges royalties based on sales: 40 to 80 cents per unit, depending on the number of panoramas in the product. Apple's authoring tools are more sophisticated than Microsoft's, so Apple is obviously trying to get a return on its R&D investment. Microsoft, on the other hand, sees Surround Video as a way to sell more copies of Windows 95 (which Microsoft recommends be used with it to obtain good performance). So, Microsoft is essentially giving away its tools by including them on the CD-ROMs periodically sent to registered developers. In addition, Microsoft doesn't plan to charge royalties. Because Microsoft requires developers to use a panoramic camera, however, it's more expensive to get started with Surround Video than it is with QuickTime VR. While a 35mm SLR camera and an extreme-wide-angle lens cost about $1000 to $2500, a good panoramic camera costs from $2500 to $22,000. Microsoft says that's an insignificant cost for professional developers, whose production budgets can range into the hundreds of thousands of dollars. Microsoft has also compiled an international directory of professional photographers who already have panoramic cameras; their rates average about $1500 per day, plus expenses. Developers thus face a difficult choice: Either pay more for the authoring tools and royalties required by QuickTime VR or pay more for the photography required by Surround Video. Fortunately, users do not have to wrestle with these decisions. Although QuickTime VR is technically superior, Surround Video is not far behind. On the screen, both deliver a similar experience — a new way of viewing and interacting with virtual environments without the need for special equipment. QuickTime VR vs. Surround Video
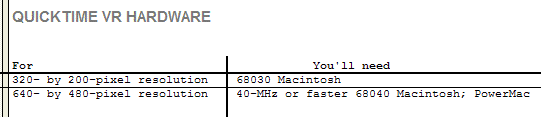
QuickTime VR Hardware
Apple's Stitcher Tool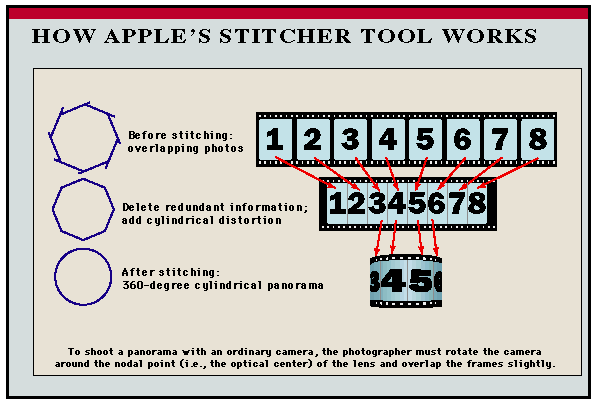
The QuickTime VR developer feeds digitized PICT files of still photos into the Stitcher program. Stitcher joins the photos together, eliminates redundant details between frames, aligns the edges, and applies cylindrical distortion to re-create the entire 360-degree scene as a continuous strip. How a Panoramic Camera Works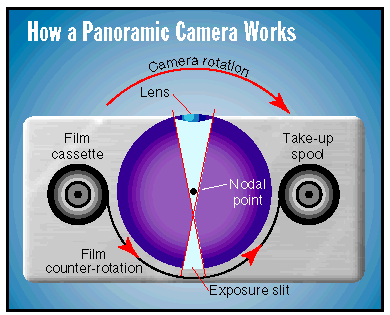
A panoramic camera takes a 360-degree image on a single photograph. Creating a Panorama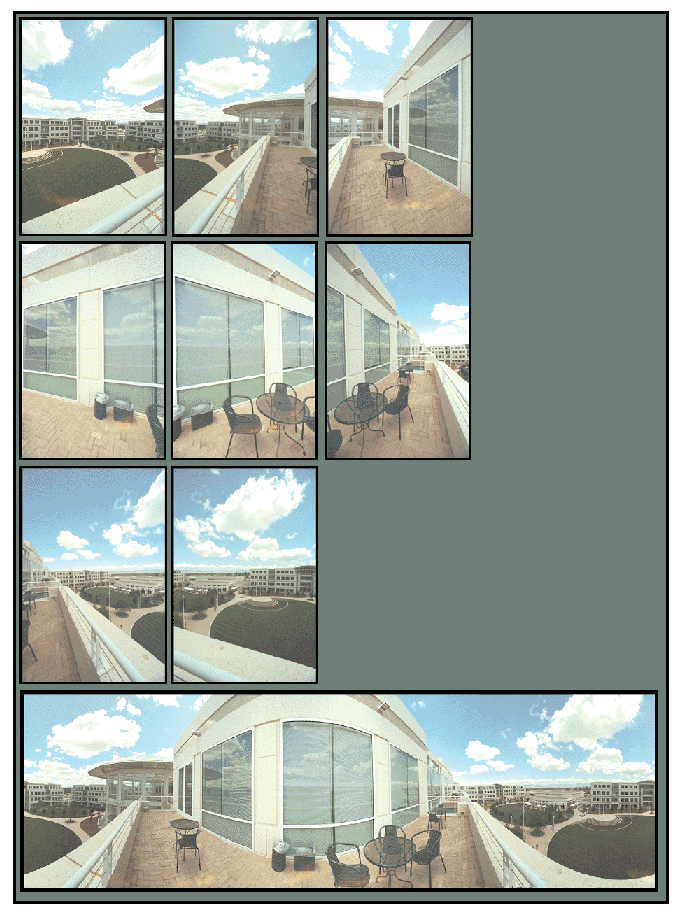
Top Row: The 3 left-hand shots. Second Row: The 3 middle shots. Third Row: The 2 right-hand shots. Bottom: The final shot after Apple's Stitcher Tool has been applied. Brooklyn Bridge Panorama
Copyright 1994-1998 BYTE |